~~~~~~~~~~~

~~~~~~~~~~~


Showing posts with label dollhouse. Show all posts

Saturday, July 10, 2021

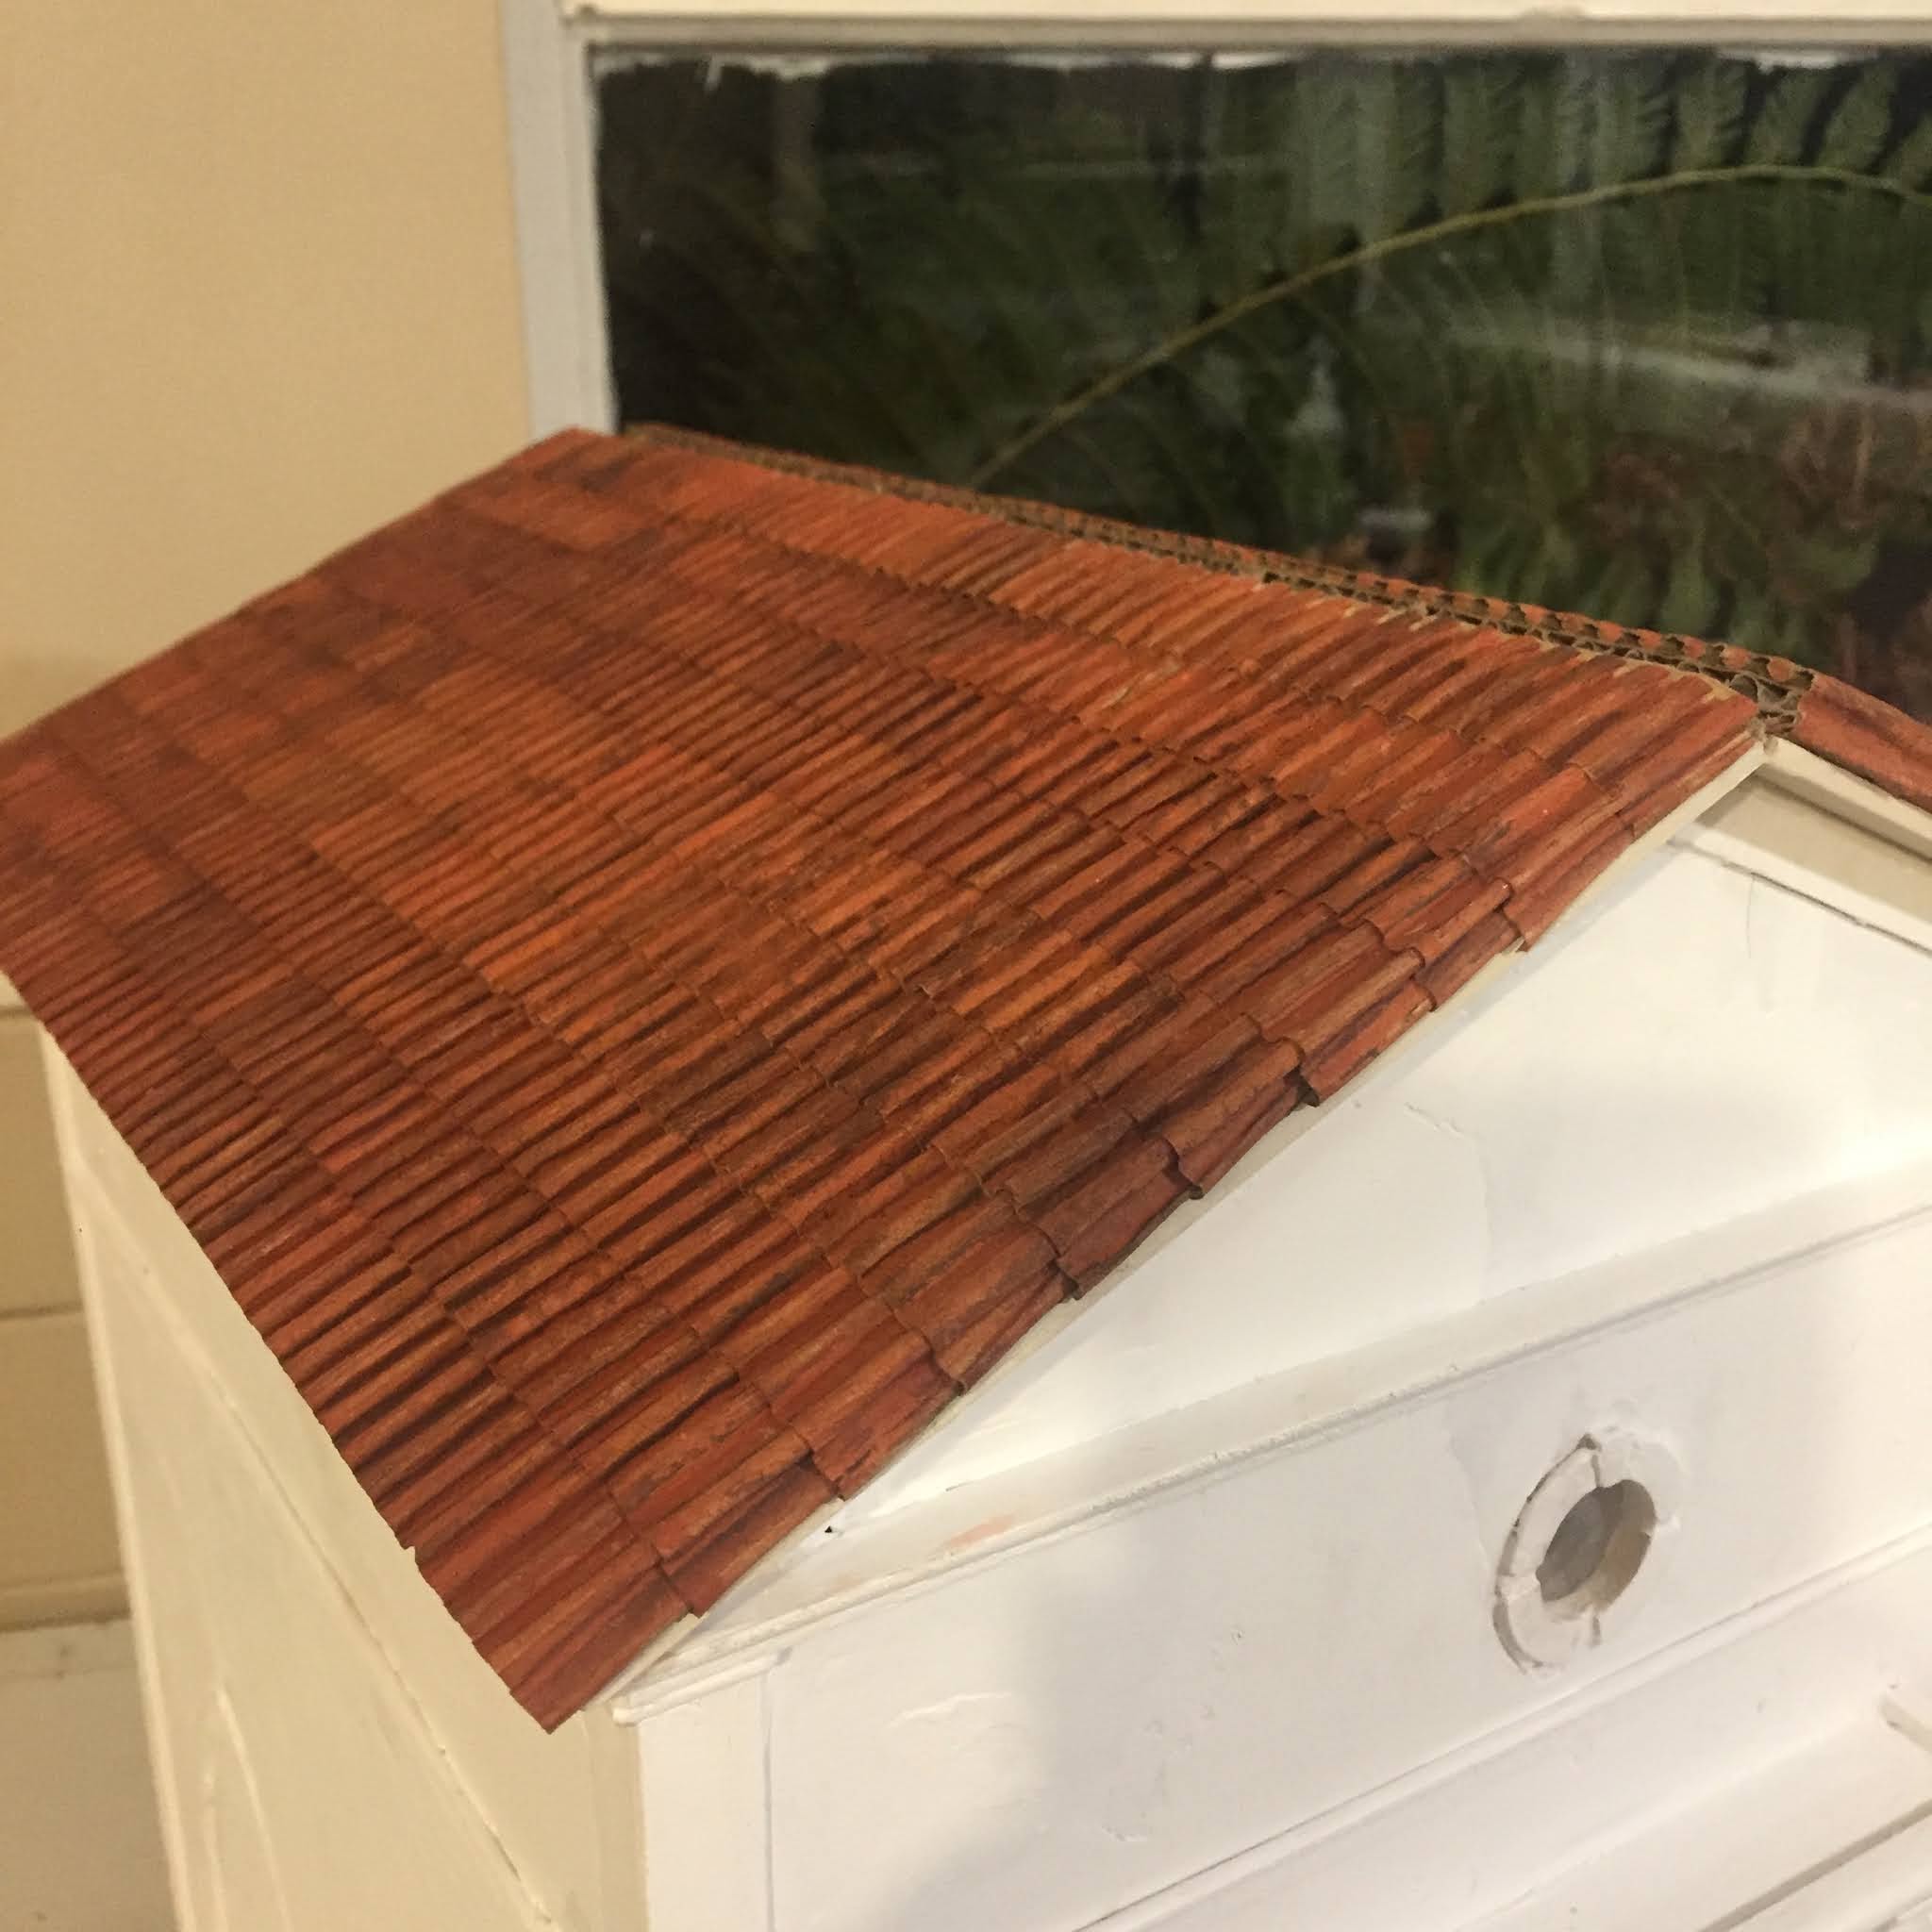
Spanish/Mediterrean/All the Other Amazing Places Inspired Easy Dollhouse Roof Tile.

 It has been an age since I last posted!. Lots of changes, yeah life does that. Kids grow becoming self sufficient, most of the last two years spent dodging drought, fires, flooding and pandemics, travelling in the teeny moments that are 'safe' and Instagram is just easier. I post mostly there now. As well as having albums on my Lavande House Fb page.

The reason for this post is to show how I did the roof tiling on my recently finished Tuscan inspired project I called Tosca. More space to do it here than Ig. The choice of name purely because while I was intensly focused on sanding the walls of my new unnamed project my rather large Tosca print decided to dismount from the wall making so much noise on it's descent that I yelled and jumped and well it became Tosca after that. Anyhoos the tiling. This is just a way I did it, super easy and so cheap. I fully subscribe to easy and cheap projects!!!! There are actaully a variety of clay tile styles in RL but this is just one way I worked out.


Cardboard, the stuff from packing boxes not the cereal packet kind. I used two different boxes. A heavy duty double thickness packing box (Bunnings), this gives the stacked tile end look. I only used it here. A smaller box I already had for the tile strips. Not all corrugations are the same. The box I used for the tiling had more more corrugations per inch and I liked that look better for this project. 

From the heavy duty box I cut out two peices that would cover the roof. I didn't have them met up completely at the top, about a 5mm gap. At the time I had no idea what I was going to do there. I painted the ends in terracotta. Get right in the grooves as much as possible. Bit of raw umber dry brushing here and there.

You can see here the heavty duty cardboard and it's double thickness I used the exposed ends to get tha stacked tile look. It has a name and I can not remember it at all now. Glue it onto your project. There  was already ply roof pieces on my project and I glued the cardboard to that. 


To get to the corrugation you need to remove one of the paper sides from your cardboard. The best way to do this is to dampen it with a rather wet cloth. Once you can see the paper soak up the water you can start to peel it away as the glue starts to dissolve. I found running a skewer down each groove as I genlty pulled helped. Don't want to pull it too much or get it too wet. Try to take it off in as larger pieces as you can as you will use it for the capping tiles. To get the most of the remaining tags of paper off I ran a piece of folded sand paper down each one. I didn't get them all out and it doesn't show. Then paint it terracotta and when dry some random dry brushing with raw umber. You will more than you think!!


I cut my strips at 1 inch. I then painted one edge with the terracotta, this is the edge that you will be able to see when glued on. As you can see I then removed the backing paper from along just the one edge, the painted edge. The papered edge gives something for the glue to hold to and holds the corrugations together but the exposed edge acts to lock the strips together in alignment as it overlaps 


While standing a the side of my house I worked from the front of the house to the back when applying the strips. On the end of each strip cut it right to the bottom of a groove. Remove that paper tag for this and the next groove as these will be folded over the end when you start each row. 


Glued my first strip sitting right on the bottom edge of the roof with the with the two free grooves sticking out from the end. I waited till the glue had dried before getting the ends tucked in.


I used the pointy end of a skewer and ran it down the between the cardboard glued to the house and the house itself. This made a little space and this is where the end of each roof strip is stuck into with a little bit of glue. Again using the pionty end of a skewer to help it in. Or my nail. Do the same for the other end. Trim off at the bottom of the groove. Remove the backing paper and tuck in the ends, etc.


I ran a line of glue across the exposed ridges and then a line one the roof, overlocking each piece about  5mm. Repeat till done!!


For the top I cut a length of 9mm balsa dowel to fit the groove at the top with just a teeny little bit extra, glue it in. Taped off an area so that the gap between the dowel and the roof tiles can be filled with spak.


                                     I mushed spak into the ends and used a skewer to shape it a bit.


For capping tiles I painted the paper I had taken off earlier. I use the same paper as the colour will match up and this paper is quite tough when it gets damp. Paint it up the same as the tiling. I cut 14mm strips cut into 25mm lengths. For the two end pieces I glued two together just to give it a bit more body and to make it look more to scale. 

For the bottom roof edges I tapped it off so that I would'nt get any spak on my tiles. Make sure my tape isn't too sticky by sticking it onto my clothing or something first. Hate it when it takes my paint off. I then just pushed the spak into the groves. I could've done this before the tiling but I had run out of spak. Let it dry and apply more when needed as it shrinks. Remove the tape. I then painted the spak edge and roof capping area with a dirty paint wash to take away all that whiteness. Sealed it all with matte varnish to protect it. 


That's it! Gee I hope this is all understandable. I love this roof look and was something I had been working on for a while when I had a lightbulb moment one night. I hope this helps and I love to share it!! 

What I used:
Heavy duty packing box (Bunnings) - roof base.
Box - tiling strips.
Paint - Kaisercraft terracota, Chromocryl raw umber.
Blue tape.
Box cutter.
Scissors.
Soudal glue.
UniPro filler.


Take care!
Carriexx


Thursday, April 14, 2011

A Quarrelsome Coventry.

The Greenleaf Coventry oh how you frazzle me. It has been a battle of the wills with this little house. With my Buttercup everything went along so smoothly that I was constantly thinking I had done something wrong. Well the Coventry made up for that thinking by making sure everything did go wrong. But a challenge forces one to think outside his or her box. Many times for me I was so way outside my box that I couldn't find my way back. Fixing up a design or plan so much that I defeated the initial idea entirely. Trials and tribulations. Thank goodness it's not a real house. The attic space. Was going to be a bathroom and main bedroom. Not so sure now. Thinking of adding wall to make a main bedroom still, wall gives me somewhere to put a light! Ceiling to low for a hanging one. But where I was going to put in a washroom of sorts but I could envisage a little wrought iron bed for a little girl. Built in cupboard in the nook. Doll on the little stool. Argh decisions!! The downstairs area is kitchen and living. For the staircase I found for $5 on a Canadian site a narrow steep stair, bought heap of them for all the houses I have stashed under beds etc. I cut it through about 3/4 way up made a return from balsa and then used the rest to enter into the attic space. Not sure what to do with the little room. Can't decide!! Was thinking of a reading/study space The roof will be tiled. I'll use 2.5mm balsa cut into varying lengths and widths stained first in a dirty paint wash.


Friday, April 1, 2011

A Buttercup Bashed


Sounds brutal doesn't it I know but it's all good really. Before I headed into a large grand minature house I thought I had better get my feet wet first on something smaller. So after perusing ebay I came across a Greenleaf Buttercup kit up for auction from someone willing to send it DownUnder. I had come across kit bashing and thought it a wonderfully creative craft that I was dying to get stuck into. But I still was'nt too sure what to do now that my little house lay out before me in all it's flatness. Searching the Net I fluked upon a tutorial on bashing a Buttercup. I can't find the site at all now but it's The Tudor Cottage by Sally Cook Thomas. So off I went then. Learning as I went. For the stucco I use tile grout. The timber faux 'beams' are just strips of 2.5mm balsa. All glued on with craft glue, the clear tacky kind. I don't have the patience to wait for PVA. I pencil out on the house wall where the timber is going to go, cover that area off with masking tape and apply the tile grout with an artists spatula. Peel off the tape and then glue down my already stained timbers beams and gently push in the grout with the fleshy part of my palm. The grout takes about 20min to set hard. I do both sides and try to think of areas I have to leave free for fitting. But the tile grout easily peels of if I've gone too far. I cut all my timbers a bit longer too just in case. Easier to cut off than to add. The brick slips I got from ebay and are Richard Stacey bargain ones. I put the house together with Liquid Nails. Love LN. I use masking tape to hold areas together while it dries. The floor is just random sized lengths of balsa with the pegs made out of toothpicks pushed in and cut of with pliers. I made it with gaps and knots so that light would filter through. It's a bit uneven and crooked but that's how old houses are. I'm living in one and all the furniture on my bedroom rocks! I knew I wanted a thatched roof and for a long time searched the net for a solution until I came across a Rik Pierce house. Ahhhh! Love his work!! There was no stopping me after I found his creations! His version of a thatched roof was simple, easy and cost effective!! Not too mention a lot of fun. I so recommend doing it outside, of course, but further from your windows than you think. Just made up a dirty wash of burnt umber and black and gave it several coats and glued it on. Cutting the angle right was a trick. Fudged it eventually. I love the freedom of this kind of miniature dollhouse making. Just do whatever is your fancy and liking. No rules just get into it! If it doesn't work rip it off and have another go. No right or wrong. Just what you do and don't like. Also I'm terrible at mitring corners and in this kind of house build no fancy corners! I always try to find the cheapest and the easiest ways of doing things. I'm a want to see it now kinda gal and have trouble having to wait too long. Although I am getting somewhat better at waiting but not really by choice. Everything I get for my houses and furniture etc all comes via the Post Office. No stores to wonder though. I wait keenly most mornings for the 'white van of joy' to pull up to see what the Postie has for me.