~~~~~~~~~~~

~~~~~~~~~~~


Showing posts with label tutorial. Show all posts

Saturday, July 10, 2021

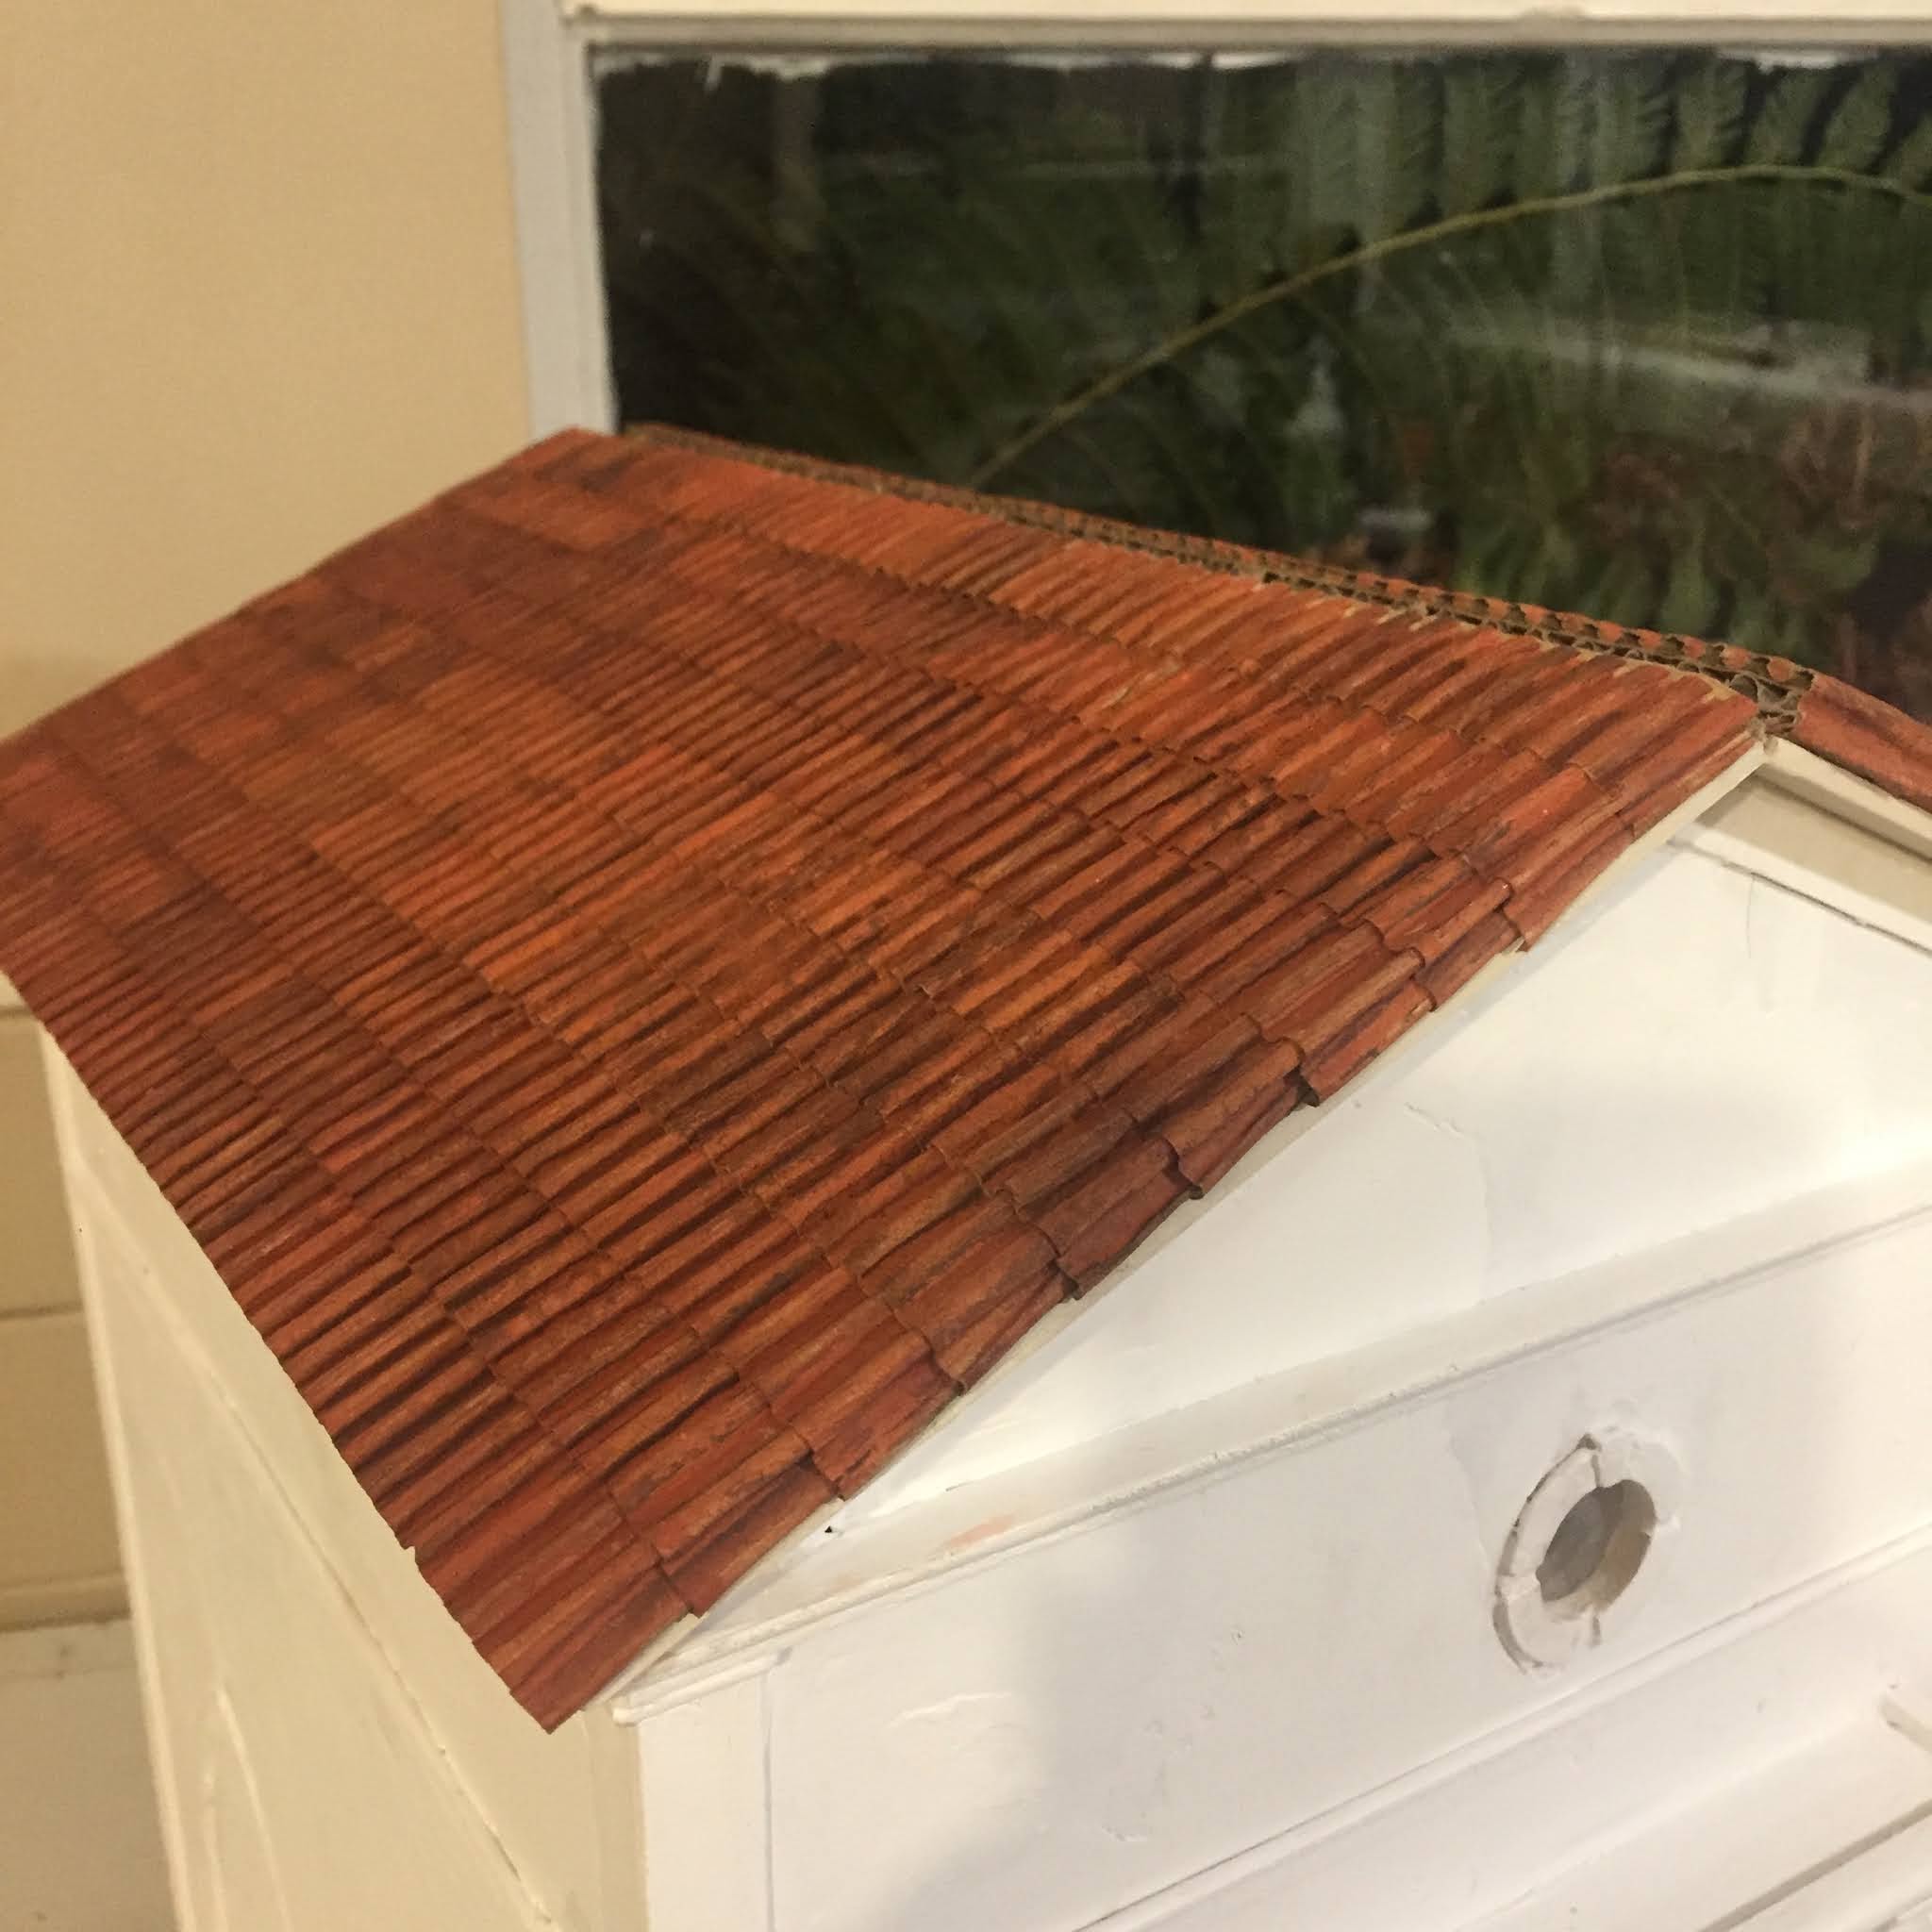
Spanish/Mediterrean/All the Other Amazing Places Inspired Easy Dollhouse Roof Tile.

 It has been an age since I last posted!. Lots of changes, yeah life does that. Kids grow becoming self sufficient, most of the last two years spent dodging drought, fires, flooding and pandemics, travelling in the teeny moments that are 'safe' and Instagram is just easier. I post mostly there now. As well as having albums on my Lavande House Fb page.

The reason for this post is to show how I did the roof tiling on my recently finished Tuscan inspired project I called Tosca. More space to do it here than Ig. The choice of name purely because while I was intensly focused on sanding the walls of my new unnamed project my rather large Tosca print decided to dismount from the wall making so much noise on it's descent that I yelled and jumped and well it became Tosca after that. Anyhoos the tiling. This is just a way I did it, super easy and so cheap. I fully subscribe to easy and cheap projects!!!! There are actaully a variety of clay tile styles in RL but this is just one way I worked out.


Cardboard, the stuff from packing boxes not the cereal packet kind. I used two different boxes. A heavy duty double thickness packing box (Bunnings), this gives the stacked tile end look. I only used it here. A smaller box I already had for the tile strips. Not all corrugations are the same. The box I used for the tiling had more more corrugations per inch and I liked that look better for this project. 

From the heavy duty box I cut out two peices that would cover the roof. I didn't have them met up completely at the top, about a 5mm gap. At the time I had no idea what I was going to do there. I painted the ends in terracotta. Get right in the grooves as much as possible. Bit of raw umber dry brushing here and there.

You can see here the heavty duty cardboard and it's double thickness I used the exposed ends to get tha stacked tile look. It has a name and I can not remember it at all now. Glue it onto your project. There  was already ply roof pieces on my project and I glued the cardboard to that. 


To get to the corrugation you need to remove one of the paper sides from your cardboard. The best way to do this is to dampen it with a rather wet cloth. Once you can see the paper soak up the water you can start to peel it away as the glue starts to dissolve. I found running a skewer down each groove as I genlty pulled helped. Don't want to pull it too much or get it too wet. Try to take it off in as larger pieces as you can as you will use it for the capping tiles. To get the most of the remaining tags of paper off I ran a piece of folded sand paper down each one. I didn't get them all out and it doesn't show. Then paint it terracotta and when dry some random dry brushing with raw umber. You will more than you think!!


I cut my strips at 1 inch. I then painted one edge with the terracotta, this is the edge that you will be able to see when glued on. As you can see I then removed the backing paper from along just the one edge, the painted edge. The papered edge gives something for the glue to hold to and holds the corrugations together but the exposed edge acts to lock the strips together in alignment as it overlaps 


While standing a the side of my house I worked from the front of the house to the back when applying the strips. On the end of each strip cut it right to the bottom of a groove. Remove that paper tag for this and the next groove as these will be folded over the end when you start each row. 


Glued my first strip sitting right on the bottom edge of the roof with the with the two free grooves sticking out from the end. I waited till the glue had dried before getting the ends tucked in.


I used the pointy end of a skewer and ran it down the between the cardboard glued to the house and the house itself. This made a little space and this is where the end of each roof strip is stuck into with a little bit of glue. Again using the pionty end of a skewer to help it in. Or my nail. Do the same for the other end. Trim off at the bottom of the groove. Remove the backing paper and tuck in the ends, etc.


I ran a line of glue across the exposed ridges and then a line one the roof, overlocking each piece about  5mm. Repeat till done!!


For the top I cut a length of 9mm balsa dowel to fit the groove at the top with just a teeny little bit extra, glue it in. Taped off an area so that the gap between the dowel and the roof tiles can be filled with spak.


                                     I mushed spak into the ends and used a skewer to shape it a bit.


For capping tiles I painted the paper I had taken off earlier. I use the same paper as the colour will match up and this paper is quite tough when it gets damp. Paint it up the same as the tiling. I cut 14mm strips cut into 25mm lengths. For the two end pieces I glued two together just to give it a bit more body and to make it look more to scale. 

For the bottom roof edges I tapped it off so that I would'nt get any spak on my tiles. Make sure my tape isn't too sticky by sticking it onto my clothing or something first. Hate it when it takes my paint off. I then just pushed the spak into the groves. I could've done this before the tiling but I had run out of spak. Let it dry and apply more when needed as it shrinks. Remove the tape. I then painted the spak edge and roof capping area with a dirty paint wash to take away all that whiteness. Sealed it all with matte varnish to protect it. 


That's it! Gee I hope this is all understandable. I love this roof look and was something I had been working on for a while when I had a lightbulb moment one night. I hope this helps and I love to share it!! 

What I used:
Heavy duty packing box (Bunnings) - roof base.
Box - tiling strips.
Paint - Kaisercraft terracota, Chromocryl raw umber.
Blue tape.
Box cutter.
Scissors.
Soudal glue.
UniPro filler.


Take care!
Carriexx


Wednesday, April 17, 2013

A Little Room Box...with one wall and no roof.

 For photos of larger items I had been using the attic room of the Maison de Livre. It was just perfect!!! But it needed to go with the rest of the house when my niece Bek finally took the keys. Argh what to do says I. Well an amazing thing happened, my brain worked! Yes in a mathy numbers and use of rulers kind of way. I usually work in the way of mmmm a gap...need to cover it...timber bit all shabbified will do. Bingo and all done. Actually it was probably motivated by what usually motivates me, a desperate need not to do more work than I need to. I didn't want to make another room box ergh too much work!! Now I sound like my kids. So mathy numbers part of my gray matter stirred from it's deep slumber and a light bulb turned on. Before it blew out I quickly sketched down the idea. And lo and behold drum roll please, it worked. It's just a little photo studio. No walls or roof. Let's in more light that way. I don't plan on talking panoramic shots here. Foam core 5mm thick. The base is two thicknesses. 5mm from one long end I have left a chanel 5mm wide. Lots of 5mm here, not too mathy. There are two wallpapers I just lorve so I wallpapered both sides of my wall. Added base boards 5mm up on both sides. So the idea is the wall just slides in and out. I can have a choice of two types of wallpaper for my pics. The base boards help it to stay in place. Did any of that make sense?? Anyways I thought I would share my mathy moment thinking it could help out someone else. I am very sure I'm not the only one to have done this but here it is, save you some Googling.

With the green wallpaper side, I can't remember the name of it doh.

Foam board is 20cm x 25cm. Channel 5mm wide and little bit at the back is 5mm. To glue on the baseboards (once the wallpaper was on) I slid the wall piece into the channel , glued both cut to size pieces of timber and bunged them on, holding them till they dried. Perfect fit then. The timber floor is just an image I found of the net and printed.


Other side, Emma in cream I think it is.


I think it works purty well.

Fizz pop there goes my light bulb. Ahh it was good while it lasted.

Nite folks!! Carriexx

Wednesday, May 9, 2012

Bicycle Makeover

I had bought this so long ago I had forgotten I even had it. I came across it looking for something else, got sidetracked painting up the bike that I now can't remember what it was I was looking for in the first place!!! But I thought the Maison de Livre would like a little old basketed bicycle leaning up against it's walls but there's way too much black! I just used a fine gesso on areas I would want to paint. Painted it in washes of lavender n soft blue. The leather looking seat it just made from heavy paper glued over and I squished it in around the edges like old leather would do. I glued two spiral like jewelry findings under the seat to be springs. I didn't get a photo of that. A basket on the front. Timber board on the back with a wicker case on it. All good to go. It was a lot of fun to do. Think I might have to get another one or two to do.


Monday, October 17, 2011

Postcards, Mail and Paper Dolls.


We had a wonderfully tropical stormy weekend so I sat in my little sunroom and wondered what I could do with paper dolls. I love them!! Had them as a kid, Barbie of course. On a school trip to Sydney years ago I came across one of those arcades full of odd shops and one was selling vintage books, etc. Inside there was a whole display of vintage paper dolls. Well they left Barbie for dead!!! The one of Hollywood's Golden Era greats were the most amazing. Ava Gardner and Vivien Leigh from Gone with the Wind where among my favourites. So I Googled once again and found many different types that were published within magazines. I put them all together and made a scruffy little box to store them in. French label on the box because there are so many of them on the net!!


Here are some mail that I promised a little while back. The postcards you cut out and just fold in half. The envelopes have been left with a lot of space around to allow you to cut the back part that you fold over. Before I cut them all out I give them a dirty wash with raw umber paint to add the age effect. The print sealed first or it all runs! The photo of the 'rocket' envelope below is how to cut them out. I use a glue stick, love them. Pinched from my eldest desk. :0)


I'm off now to make another scruffy box for my mail. I have more lovely french labels and another storm is on it's way!

Sunday, July 17, 2011

Rugs and Clocks

I had a go at printing fabric on the weekend. It was now where near as horrible as I thought. Had visions of the printer going berserk and ink going every where! But no it is as easy as printing on paper. Just a bit more preparation. I had some 'pretend' linen. Not the real thing, bit out of my budget range. Gave it a good iron. Sprayed an A4 sheet of paper with spray glue and laid the fabric on top. Patted it down to make it adhere. Sat a heavy book on it for a bit to let it really set. Trimmed off the fabric . Making sure it was neat and exact. Print it out on the glossy photo setting. I let it sit for a bit to let it dry and then gave it an iron on dry setting ink side down. Now the ink is not set. Meaning it will run if it gets wet. I have tried all sorts of things to set it and so far none of it has worked. You can buy a rinse I think that will do the job but I didn't want to spend anymore money and I don't know how well it works. Alternatively there are fabric sheets I could have bought but again more money I didn't want to spend. I have however given my rugs a quick going over with my spray matt and that seems to do the trick but I still wouldn't wet it completely. Just allows for sprays n sprinkles that seems to happen. I cut them out with a rotary cutter. Left half an inch at the ends. I used a light iron interfacing to back the rugs to add a little body and to help stop fraying. I sewed along the edge of each print so that I could fray the edges. I set my stitch length to 1.5. It also helps to add body as well as stopping it from fraying too much. So many rugs can be found doing a Google image search. I made the little alarm clock out of bead spacer, pins, findings and buttons. The main body of the alarm clock is just two buttons glued together. Backed with a finding cause it pretty. Cut off brass pins stuck into the back through the holes for the little turny things. Bead spacer for the donger thins on top and another cut off pin for the hammer. A tiny bead cap for the foot. Printed out a clock face. Ages ago I found these see through scrap booking things that are perfect for the domed glass. Love those $1 bins! The wall clock was made out of cardboard and an assortment of brass findings. I used a hole punch and cut out four circles from a cereal box and glued them all together for the clock body. Then just arranged the findings and glued them in place. The same thing again for the clock face. Working on doing one with a chain and pendulum.


Friday, June 17, 2011

Beautiful Plates

I came across this idea from Carolyn's Little Kitchen blog. She has a great tutorial on how to do these plates. I found the water decal paper on ebay. What would I do without ebay?!! Google image search provided all the images an my faithful Adobe Photoshop allowed to organise them all to print. It was a little nerve racking at first but once I overcame my fear of making a boo-boo I was off! I ran out of plates, phooey. Will have to wait for the Postie. Oh one thing I did learn from error. That is to know how exactly your printer feeds paper. My first collection of beautiful plates ended up on the backing paper. Erk.
Big thank you to Carloyn!!!!!!!

Wednesday, June 15, 2011

Old Worn Fireside Chair

These chairs can be picked up for very little dollars on ebay but the luminous red of this chair that is supposed to be mahogany is awful. I like the red padded velour cushioning but the timber had to be changed. So I needed to pull it apart. Fun!! To loosen the glue I put the chair in the microwave for 15 seconds. Careful lot to loosen up too much glue holding the timber together! The glue softens and then the fabric panel came off very easliy. I hit the timber with the paint stripper and washed it off. I wasn't to fussy in getting all the stain off. Sat it in my warm oven for ten minutes to get it to dry out. We are actually having a cold winter here this year so I've taken to drying things out in my oven. I gave it a light sanding all over paying attention to rounding off the edges. I didn't want it too dark and I'm generally lazy/impatient so instead of tackling a can of wood stain I used dark tan shoe polish. Just rubbed it on with a cloth let it sit and went over it again to make sure there wasn't any excess left. I wanted the velour to be worn and rubbed back. Velour is cotton so when it is burnt it doesn't melt like polyester but singes and falls away. So I hit it with a flame on the areas that would be typically worn with age. Sometimes it does catch alight but I just blew it out. Keep moving the fabric over the flame to stop it catching alight. When it cools off just rub over it with a cloth and the blackened cotton comes away leaving the even weave underneath. For a more frayed look just keep having small goes at it till it comes away. Then just glue it all back in place.


Saturday, June 11, 2011

Easy Mini Books

I came across this simple idea in Jane Harrop's 'Thirties and Forties' book. Simply a book jacket printout glued to a piece of balsa and aged with a wash of dirty brown. I adpated it a little bit. But it goes as follows. I found a heap of book covers via Google books. You can find entire libraries online with complete books. After saving the image I change the resolution to 300dpi and re size them to fit 1 inch scale. Increasing resolution gives a finer detailed printout. I do it all in Photoshop. Print them out and then to set the ink I give the paper a spray of matt. Then cut out. To a length of balsa I round of one side by rubbing it along sandpaper to give the look of a spine. I use a Bostick glue stick all over the balsa and glue on the printie. Along the page edges I use a round needle file to rough up the balsa and it gives the appearance of pages. Plus adds the convexed look of a large book. If you don't have a needle file I reckon a small piece of sandpaper on a toothpick might do it. You could also use the pointy bit of the pick to 'scratch' the balsa. Then a quick going over with a very watered down raw umber and pat down. I found the process of scruffing up the balsa can sometimes curl up the paper cover giving a great dog eared look. I use different thickness balsa as well. 1mm through to 3mm. I've got a printout of an old Bible I will use 5mm for that. Great for using up my containers of bits of balsa. That's it. These look great stacked together. I have just completed 100 printies!!! Argh. Took two days. The weather isn't too great and good for sitting in front of my PC. They are printed out and waiting for pages.

Monday, May 23, 2011

Flooring.

For the flooring of 'Warm Thatcham' I used 2.5mm balsa. It's cheap, can be cut with a craft knife and I can easily get my hands on it. I cut into lengths 1/2" wide. For this house I wanted to really capture the idea of it being a real floor and I wanted light from above and below to filter through the cracks. I laid out a grid work of beams first. I used 9mm square balsa. I whittle the edges with a craft knife and sanded it a little. For the effect of peg type nails I used a round needle file to put a hole in the ends. Pushed in a satay stick which I cut of with bullnose pliers. Stained them and then glued in place. Beams around the interior on the first floor line and then crossbeams on those. L shaped cut out on each end so it would sit flat for the floorboards to sit on above. I laid lighting wire along grooves I cut out along the top of the beams all the way over to the chimney which is where I was hiding all my wires.
Floor boards cut into varying lengths. I made knot marks in some by going at the wood with the round needle file at an angle. Then stained them. Laid them down on the supporting beams and pierce a small hole where a peg would go. Where it would go through to the beam if it were real. Holes made with round needle file but used toothpicks this time as pegs, again cut off with bullnose pliers. Glued them in place. Occasionally checking that it was fairly straight. Allowing a little wonkiness and cracks. Worked my way across and cut the ends of when all done.
I love the effect. While it is easy to do it is the most time consuming. This was a small floor area to work on so I went a little bonkers doing it. For the Coventry I used precut timber flooring. I got them from ebay. Yay ebay!! $7 for a bag of 100. It's oak and are very thin. Easily cut with scissors. Cut a heap in varying lengths and glued them on straight to the ply floor of the house. Went along after and filled in the gaps. Cutting around corners and allowing for doorways etc. Gave it all a light sand then quickly painted on the stain. I left it darker around the edges, rubbing it off more where people would walk. I have found here in our tropical climate that after high rain and humidity the floorboards curved a little. I loved the look but I think to stop that from happening I would have to cover the entire timber strip piece in glue and work in sections. Placing something heavy on it to keep it flat and let it dry out. But I loved the curled look. I did the same for the first floor. This method is so much quicker and easier but a different look. Way to go with larger areas to cover.

Sunday, May 22, 2011

Flowering Creeper

This creeper of mine is an unknown variety, I made it up. I knew what kind of leaf I wanted, very much like a wisteria but could see a single yellow flower so that's what I did. The vine itself is completely inspired on how Rik Pierce does his. 20 or so lengths of wire wrapping around itself. Painted over that with gesso. Then colour washes in grey, beige and green here and there. Was going to do the fluffy landscaping stuff but eh.... not so sure. The colour wasn't quite right and I would've had to buy some more. nah. So out came the crepe paper and soaked strips in watered down acrylic paint. I did four varying shades. Just added more of a green after one strip had been soaked. Took a bit to dry. Leaf punch for the well leaf. Glued them on the ends. For the flowers ages ago I had found packets of Lily of the Valley in a cheap bin. Love those cheap bins! Wash of yellow on the outside and soft pink on the inside. Glued on the end of each branch.


Flowers and Pots.

Today I potted. Got out my assorted collection of little terracotta pots and got them gungy. I gave them all a wash of a dark sap green followed by splashes of a lighter sap green around the rim mostly and finished of with burnt umber around the base. I would do about five at a time. Because I then put them all into a glass of water and let them sit for a minute or two. Took out one at a time and rub over them with a cloth to give it a more weathered look. Once they had dried a bit it was time for some moss and lichen using that fluffy landscaping stuff. The flowers are all made from polymer clay and sooo not by me. I got them through ebay from seller called beautifullyhandmade. She also has roses and gladioli. Many different colours and they are lovely. She's in England but charges the most ridiculously cheap postage. She also does a variety of food and charges very little. In the pots I used a ball of paperclay with a squirt of white glue in first. The flower pushed into the clay and then more green fluff stuff and PVA to cover it all up.


The rabbit is from beautifullyhandmade is well.


Friday, May 20, 2011

Warm Thatcham

Well I commandeered the kitchen table, determined to get my little house finished. To have one of my houses finished! I am very good at starting but my finishing needs a lot of work! I have done the larger portion of the landscaping for now. The wisteria needs foliage and flowers. I have a daffodil kit en route somewhere over the Pacific and they will be scattered around the garden. Mossy pots stacked and pile of wood for the fire, etc needs to be gathered and glued in place. A chook and hedgehog are still determining their allotted space in the garden. I have included some pictures of 'Warm Thatcham' so far. I am so looking forward to finally furnishing one of my homes! I have mountains of furniture, plates, bits and bobs that I have been collecting like the proverbial packrat for over a year and to use them finally will be lovely. I will still have to make the larger portion of furniture as the house is so small and the usual pieces of furniture you buy looks even chunkier in my little house.


Looking in through the front door.


Bay window to the right of the house. The wisteria waiting for it's leaves.


Looking throught the front door into the lounge.


Looking through the back door into the kitchen.