Good day to everyone!!! I hope you are well and if you aren't then do look after yourself!!
This year went off with a bang!! and I have only just now managed to come up for some air!! Been a stinking hot summer to boot. I got cracking with some turfing! When I actually stopped and looked, you know really looked I realized I am just about done with Laurels. She's been sitting there in my work room for so long now and always always needing something done or that not done yet that I hadn't noticed that there really wasn't much else to do. Roof capping (oh isn't that fighting back with a vengeance!!) and the turfing. So once I found all my green stuff I got into it. That took way more time than I would've liked. Joys of moving house and unpacking in a caffeine crazed frenzy. There's an hour of my life I'll never get back but I did eventually find it. Yes in the container marked garden stuff......... Moving on, I then had to sit and remember what I had planned and how I was going to do it......... So by the afternoon I was finally getting into it bah!! Rome wasn't built in a day they say well neither is miniature turfing. Not when I'm doing it anyways.
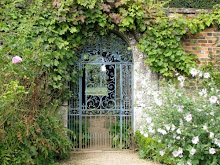
I paper clayed a stone area first and steps. I just glued scrap bulsa wood pieces together for the step till I got the right height. Covered that with the clay and added a brick insert. While that dried I moved onto turfing the back and sides.

I started with my chimney first. I would like to say it was my awesome skill at painting that got the lovely stone effect which isn't really picked up that well in the photos but take my word for it. But it's not. I used a cheaper paper clay DO NOT DO THAT EVER YOU WILL REGRET IT and when it cracked more than nuts on Christmas Day I used spak filla to fill the gaps. Well the two absorbed the dirty wash in two entirely different ways and left a great look. So huge fail paid off after all!! I then mossed it. I have my own mix of turf. I use Woodland Scenics as follows. Fine turf in Earth and Green Grass. Coarse Turf in Medium Green and Light Green. I also use bits of Bushes in Dark Green sometimes on its own for a bit of variety. I toss the first four I mentioned into a take away container and give it a good shake. The fine stuff will drift to the bottom but that is handy for when you are doing just moss in cracks etc. I have a fine glue applicator bottle. I use it to run thin lines in the cracks and bumps and then just push the moss mix into it. Let it dry before I gently brush it with a really soft brush. I lay a piece of paper underneath to catch the excess.

I then moved onto painting my paper clay. A couple of coats of dirty wash. Equal dollops of black and raw umber in a jar with a cup of water. Extra painting along the edges where it would be dirtier. Painted the bricks. Lines of moss in the cracks and grooves.

I wanted to try some of these new meadow grasses products that are on the market. After doing some researching my head started to hurt with so much to choose from. I looked on Ebay and only one high quality one came up and I went with that. Summer Meadow from Model Scene. I didn't take any close up pics of it and I will remedy that. Turf sheets are like the paper clay incident. You get what you pay for. I bought a cheaper one as well to compare and it would look ok on mini golf course but not what I was after. I cut it up into pieces and glued it into corners etc as it would in real life. Then I filled the gaps with my turf mix. I laid tape around the timber frame first so that I wouldn't get glue onto it. I use a lot of glue and push the mix in. If glue comes through then I add more. I left it for an hour and then gently brushed of the excess. Any gaps I filled.


The standard rose is a kit I purchased from
TheMiniatureGarden. It was soo easy! I had been putting it off like a complete chicken for months thinking it was going to be hard but it wasn't. The effect is so lovely. I have a climbing one to do next.
But the Old Laurels is coming along nicely. It shall be finished this year!! Wooty!!
Roof capping next. Grrrr.
See you all next time!!!!! Don't behave too much!!
Carriexxxxx